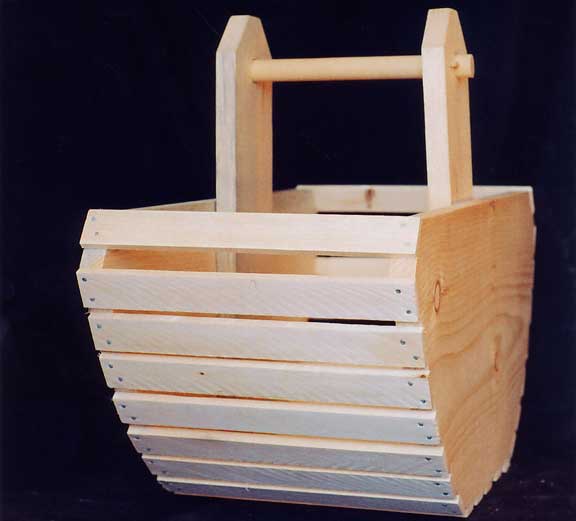
Before you dig into your own steamed clams, you have to dig them up. Here's how to make a basket to collect your snappy clams.
"As happy as a clam that's digging in the sand when nobody's looking for him." This was a common childhood refrain when I was a girl. Skipping on the beaches of Atlantic Canada, such chanting children could mean soft-shell clams (Mya arenaria) or Atlantic surf clams (quahogs), both of which have provided sustenance to local inhabitants since pre-European times. And beyond sustenance there was money to be made, for a barrel of salted clams could be sold as bait to a Grand Banker for three or four dollars. (Of course, it took three or four barrels of clams to make a barrel of shelled bait…)
Throughout the years various gadgets have been used to dig clams-a hydraulic clam fork, suction this and that-to improve upon the stooping, levering-up motion of the traditional short-handled pitchfork method. But none has caught on; the old ways have remained the best in at least this one traditional fishery. Only the baskets have evolved, here, where there's a rich tradition of basket making. Traditionally fishermen's baskets were woven out of pliant shoots of native woody shrubs such as alder, dogwood, birch, cherry, elder, willow and witherod. But there have been crossovers with what was done in the Mi'kmaq community, where baskets were traditionally woven from black ash splints, and also the Black community, whose market baskets were made from red maple splints.
Some clam diggers may still make traditional baskets, but ours is made of planks and laths, modelled on what fishermen Don Holt and his son Peter, in Bocabec, NB, have been using for years. These lath-and-plank baskets are commonly used on the Bay of Fundy shores, and the materials are readily available.

1st trace

Mark cuts

1st cut

2nd trace

Plane edges

Side arms
1. Lay one of your pine boards on the workbench with the tree rings curving upwards like a "U," and mark it with an "O" for outside-this will be the outside face of one of your sides. Orient the grain to be as straight as possible along the top edge of your basket, and use a flexible batten to draw a pleasing curve on this face. (A piece of lightweight lattice lath would also work; or you could use a garbage can lid, a pencil-and-string compass, or just draw a freehand-drawn curve.) We made our basket 12" deep and wide, and 2' long, which makes for a comfortable load to carry.
2. From each of the top corners, measure down 2" and along 2"; mark these measurements with a pencil. Join the two diagonally-this is the line you will cut to.
3. Find the centre line of the basket's side by measuring half way along the top edge. Square the centre line down to the bottom edge using a carpenter's square. Using this line, square up and mark the bottom of the basket. A 10" bottom - 5" each side of the centerline-makes for a stable basket.
4. Cut the first side out using a jigsaw. Tack it temporarily to the second board, keeping the tree rings on this one facing down on the workbench, like an "N," the long grain oriented the same way, and trace around the shape. Remove the first side and cut the second side out. Rejoin the two sides together temporarily, and plane them to get a nice smooth match. Keep the edges square to the faces as you plane, using a tri-square to check your work as you go.
5. Sand the laths a little before you cut them to length, given they tend to be rough. The best way to determine how long to make them is to do a mock-up of how wide you want your finished basket to be. Place the sides on the floor a set distance apart, and imagine yourself picking the basket up and feeling how it will be when fully laden. We cut the laths 12 1/2" long, which made the finished basket quite narrow but easy to carry.
6. Cut a dozen laths to length. Begin by fastening the two at the top edges-on that little back cut you made. With one of you holding the sides and the other lining them up, drill pilot holes through them and nail them in place, keeping them square to the sides. Once you have the top edges done, flip the basket over and fasten the next two laths, one at each end of the bottom. Next, evenly space as many laths as necessary across the bottom, again keeping them square to the sides; drill and nail them on. (Note: A pilot hole will prevent the laths splitting by giving the nail a hole to follow, and if you offset the two pilot holes per end the nails will not split out the sides.) Cut more laths to length if you still need them. Tip the basket on its side and evenly space the next series of laths up one side, from the knuckle at the top edge to the one at the bottom, marking their position with a light pencil mark. Drill and nail each one in place keeping them square to the sides and flush with the edges. Do the same for the other side.
7. Time to design the handle uprights. They can be curved or squared, thin or thick. Height is the most important issue here, and again I recommend a mock-up-take a piece of scrap, or even stiff cardboard, and clamp it to the edges of the basket. Now stand beside the mock-up as though you were going to pick it up, and make a fist. Measure approximately 6"-8" below your fist and mark the handle with an "X." (We also used a scrap piece as a block beneath our handle mock-up, to lift it a set amount off the bottom of the basket.) Before removing the handle upright, mark its location on the inside of the basket. Square this across to the other side to ensure alignment later.
8. Tack together two pieces of an appropriate size of pine to make your handle uprights, and find the centre on the vertical. Transfer the "X" from your mock-up to this centre and drill it using a 1" Forstner, or a spade bit (or whatever you need for the dimension of your dowel). Shape the top, leaving approximately 2" of wood above the hole for strength.
9. Clamp each handle in turn to the inside of the basket and screw in place. Note: An angle drill will save you from having to pre-drill if you are using self-tapping screws. However, if you need to use a screwdriver because of space limitations, pre-drilling will make the job easier.
10. Take the 1" dowel to your bench, vise clamp it firmly and drill a 1/4" hole through the wood, 1/2" from the end (clamp a block of scrap wood on the back to prevent tear out.) Cut two 2"-long pieces of 1/4" dowel, smooth the end with sandpaper, and tap one through the hole using a mallet-a scrap piece against the peg as a hammering block will prevent the end of the peg from splitting out.
Slide the 1" dowel through the handle uprights until the peg fetches up against the side, and mark it flush with the other outside edge. Remove the handle and, keeping the 1/4" holes aligned, drill for the second peg. Re-insert the handle and tap the second peg through the second hole. Note: You might need to clamp the two handle uprights together when tapping the second peg in.
And there you have it; time to go digging.
Tools:
- Jigsaw
- Flexible batten
- Pencil
- Carpenter's square
- Tri-square
- Drill and pilot-hole-sized drill bit (determine how big this bit should be by holding one of your nails in front of the drill bit you gauge to be of similar size-if you can see the edges of the drill bit behind the nail you need a smaller sized bit
- Handplane
- Sandpaper
- Screwdriver, or driver bit for the drill
- Handsaw
- Hammer
- Measuring tape
- Mallet
Materials:
- A bundle of 1/2" by 1/4" laths (avoid the lattice laths, which are too light)
- A box of galvanized 1" common nails
- Three pine boards 1" thick, by up to 12" wide. Two should be 2-3' long; the third, which is for the handles, can be narrower and shorter. Offcuts will do
- A length of stout dowel, 1" - 1 1/8" in diameter
- A length of 14" dowel
- A dozen 1 1/2" deck or stainless-steel screws
Note: An assistant is an asset.
Clambake know-how
The old-fashioned beach clambake-a bit of a misnomer, given the clams are actually steamed-is a great event for a family or community gathering. The night before, soak the clams in a saltwater bath: add 1?3 cup salt to 1 gallon of water per quart of clams, and pour in 1/4 cup cornmeal over top, which helps to clean them out; leave in a cool place. At least 2 or 3 hours before the bake the following day, dig a sand pit about 1' deep and 3' across, and line it with smooth round rocks. Build a hardwood fire in the pit, on top of the rocks, and keep feeding it until there's a good bed of hot coals. This should take 2 to 3 hours by which time the rocks will be hot.
Meanwhile, scrub the clams and rinse them clean in fresh water. Gather and rinse a heap of rock seaweed, and let it soak in fresh water for about an hour before using. Thoroughly wet a canvas tarpaulin in either saltwater or fresh, larger by a foot than the pit area, and have it and half a dozen heavy rocks ready by the side of the pit. Fill a bucket with seawater.
Once the rocks are hot, remove the coals from the pit using a shovel and spread them out on the sand to burn out (beware of bare toes), or heap them up and douse with seawater. Line the pit with wet seaweed, about 6" thick, and add the clams.
Cover them with a layer of seaweed, or cornhusks if you're steaming corn along with your clams. Sprinkle with seawater from the bucket, quickly covering it all with the wet tarp; weigh down around the edges with the rocks. The steam pit should be covered for about an hour during which time it will puff up like a slumbering sea creature. To test for doneness, lift the tarp at one corner carefully, trying not to get sand in the pit, and see if the clams have opened. If so, the feast is ready.
Of course you can have a clambake off the beach, too. A similar steam pit can be set up at home with a propane lobster boiler and a large pot. Line the bottom of the pot with a thick layer of seaweed and add a quart of water. Bring it to the boil and add your clams. Cover the pot and boil gently for 5-10 minutes, or however long it takes for the clams to open.
On or off the beach, you can add potatoes, sweet potatoes, quartered chicken, lobster, corncobs-you name it-to the steam pit. Just remember to layer from hard food to soft, and keep the soft-shelled clams on top.
Where to go
To find out what beaches are open for digging clams in NB, PEI and northern NS, call the Department of Fisheries and Ocean's Recreational Fishing department: (506) 851-7798.
Or check out the Environment Canada website. Follow the links for pollution, water pollution, shellfish classifications, maps to the four provinces and their sectors.