
The aboriginal origins of backyard tobogganing In a perfect mating of environment, need and lifestyle, people native to the northeastern regions of this continent long ago invented a vehicle-"Utapanashk(u)" as the Innu called them, toboggans today. They were fashioned from a variety of materials: the eastern Aboriginal Peoples once made them out of bark and used them for hauling game, whereas the Inuit made them from whalebone. More commonly, though, they were made from wood-larch or birch boards, with crossbars and leather thong lashings. During the seasonal migrations of these nomadic peoples, every able body was employed in pulling a laden toboggan.
Nowadays we use them for fun rather than transportation, and we can build them using modern fastenings. The curved prow design, however, remains intact, ideally suited for travel over uneven snowy ground. The towing capacity remains indisputable; try loading up a clutch of young children, strapping on your snowshoes and hauling them around. Alternatively, you can just let the kids go play on the nearest snowy hill where they do all the hard work, and have all the fun.
Making your own toboggan is a simple affair for anyone with even rudimentary woodworking skills.
Tools:
- Block plane
- Bench plane
- Sandpaper
- Drill
- 1/2" drill bit
- Countersink bit
- Clearance hole bit
- Pilot hole drill bit
- A selection of clamps
- Pencil
- Tape
- Box of 1" #10 flat head, stainless steel screws (#8s will do if you have those instead)
- Some lengths of scrap wood
>
1 Decide how long a toboggan you want. A 4-foot one is suited to two or three small riders; a 6-foot model will take approximately five adults, while an 8-foot one will accommodate half the neighbourhood!
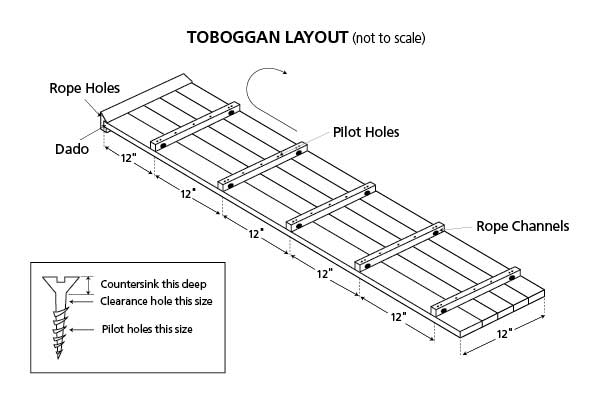
2 Armed with this information, go and visit your friendly woodlot owner, or local lumber mill, and ask for good green (wet) ash, or maple, a quarter to three-eighths of an inch thick, of the length you need, adding two feet for the curve. Get enough boards that, when laid side by side, will make up at least a foot wide toboggan, plus a couple extra in case of breakage. You will also need a length of 1x1" for cleats. Note: The exact number of cleats you need is determined by how long your toboggan is going to be. An eight-footer will use nine cleats, a six-footer, seven, and so on.
3 Plane your lumber down to 1/4", or 3/8" if your purchase is thicker. To do this by hand, clamp the board to your workbench and use a Number 5, 6, or 7, Stanley-Bailey plane, with the grain. This type of long plane, with a nice sharp blade, will do the job easily. Round off (chamfer) the long edges of the boards with a block plane, and sand them smooth.
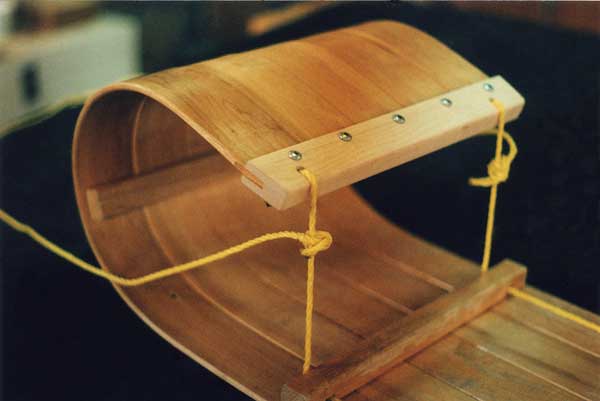
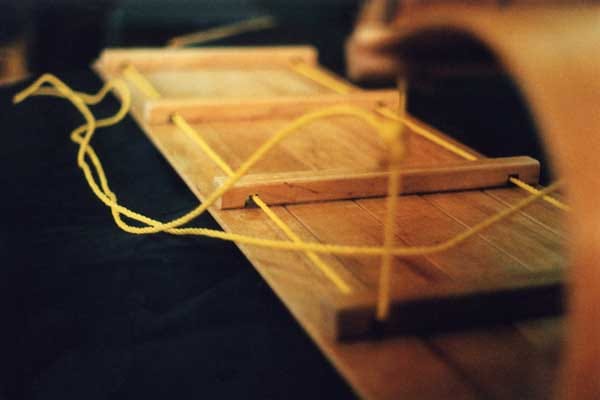
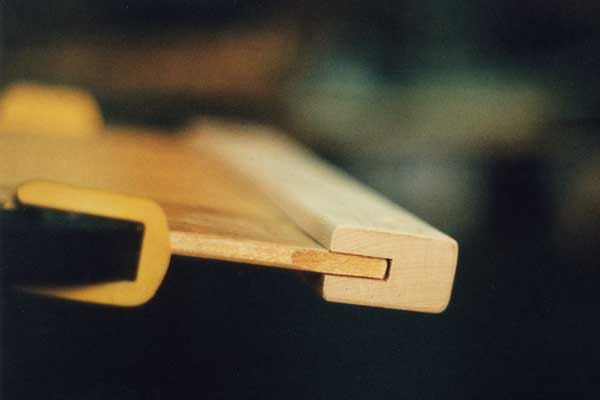
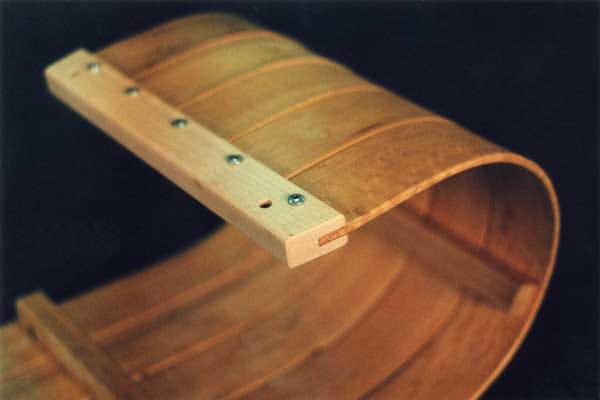
4 Chamfer the edges of the material you are using for cleats and saw them to length. Sand the rough ends. In all but the one, cut half-inch channels for the hand ropes, one inch in from each end. (See photo)
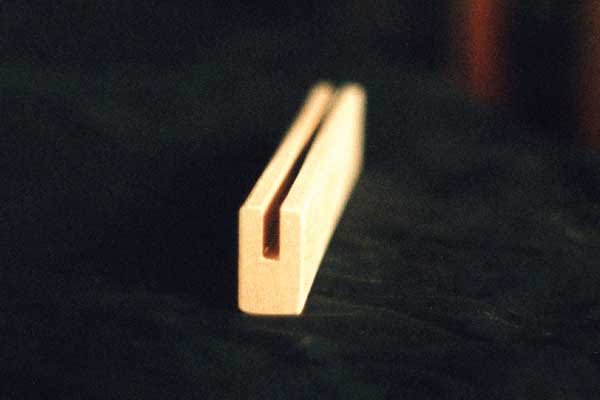
5 Cut a slot (dado) in the full length of the final one. (See photo.) To do this, measure the width of your piece and divide that measurement in three. If you have a table saw, set the fence this distance from the blade, and the blade at a height of 3/4". Carefully run the cleat through, using a push stick on top and one on the side to keep it firmly against the fence. Turn it around and run it through again. You may need to make a third pass to clean out the centre before doing final clean-up with a chisel. If you are working with hand tools, a rip saw and chisel will do the job equally well.
6 Dry fit the piece to one or two of the boards and make any necessary adjustments in width of the dado. You will get a better result if you chamfer the ends of the boards before fitting them.
7 Remove the cleat once more and drill two 1/2" holes for the rope. Locate it ahead of the dado and between 3/4" and 1" in from the edge. Remember to use a backing block to prevent tear out. Finally, relieve the square corners to 75 degrees. Match the angle on the forward 3/4" of the boards.
8 Lay your boards down side by side on a surface you can drill into. Number them as you go. Using some lengths of scrap wood, make a sandwich of them in two locations. Clamp them on each end.
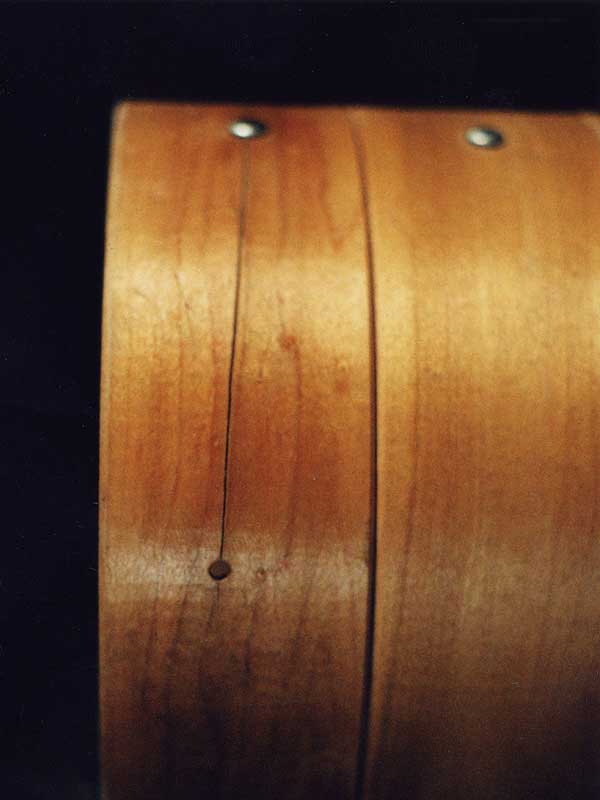
9 Clamp the cleats 12" apart, starting a couple of inches in from one of the ends. Number the cleats so that they go back in the same places later. Drill pilot holes through the cleats and boards. Drill two in the two outside boards and one each in the centre ones. Now, with the assembly still clamped, turn it over, drill clearance holes and countersink holes in each of the pilot hole locations. Drill the countersinks just deep enough that the heads of the screws will be slightly below the surface level. Don't drill them too deep! (See diagram) Disassemble the mock-up. Now comes the fun part.
Traditionally, the boards would be joined together before being steamed. Any cracks that occurred would be tied shut with sinew as the craftsman went along. However, this is nerve wracking, as any complete break will mean that all your previous work will need to be undone. So, unless you are a seasoned woodworker, the recommendation is to work each board individually and then set the final curve by re-steaming the end of the toboggan after all the pieces are put together. So…
10 Get your lobster boiler going and bring a large kettle full of water to a boil. Choose a location for this set-up where you don't mind the steam build-up; a sheltered spot outside is ideal. Have some lengths of rope handy and your bending jig, which can be a round log, a bucket, a length of PVC pipe, or anything else that will withstand some pressure, water and heat.
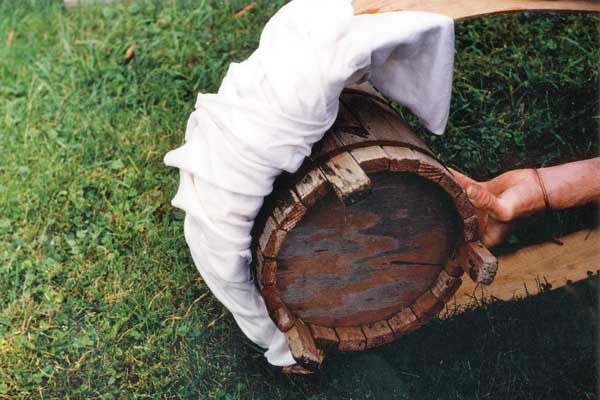
11 Wrap rags around the ends of the boards, and pour boiling water over them; wrap more rags, pour more water, and so on. Then wrap the whole in plastic to capture the heat against the wood. (See photo)
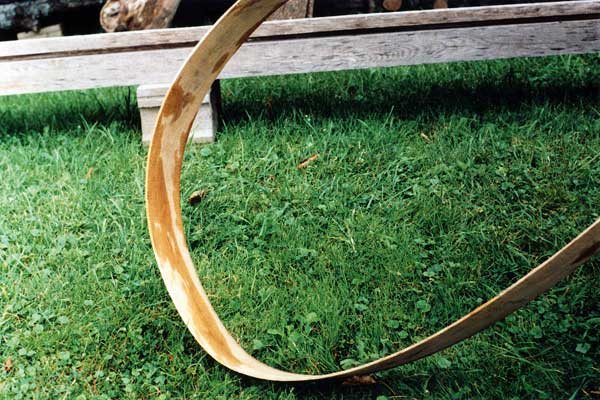
12 When the wood is good and "cooked," (15 to 20 minutes) flex each boiled board around the bending jig. Work quickly, but don't rush it; you are asking a lot of the wood grain that wants to lie straight, so ease it into shape with smooth, even pressure. Over-bend the wood, as some spring-back will occur. Tie the ends down to the board using a little screw in the pre-drilled hole to catch the end of the rope, if necessary. Once tied securely, work the next board, and then the next in the same way. You may need to slide one or more of them off the bending jig to make room, but do this only if you must. Note: if a crack occurs, you can prevent it from getting out of control by drilling a hole at each end of it. Only if there is a complete splintering break-out must you discard the board and use one of your spares. (See photo)
13 Once all the boards are bent and tied, clear away your steam pot and fire. Unwrap your boards and take a break until the wood is cool and dry.
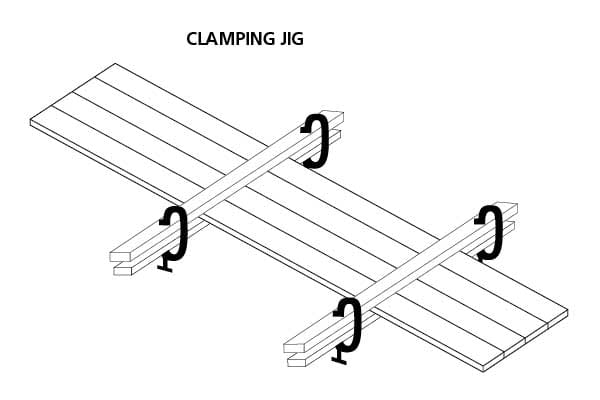
14 Untie the ropes holding the curves down and lay the boards out in sequence. Clamp them together using the jig you used previously. Beginning with the rear-most cleat, clamp and screw it on. Using a little Bolwax or soap on your screw shank will make it go in easier. Repeat with the rest of the cleats.
15 Depending upon how much spring-back there was when you untied the boards, or how different the curves were from one board to another, you may want to re-wrap and steam the curve now that the toboggan is together. Follow the same procedure as before.
16 Sand the whole piece smooth and apply your chosen finish. Exterior Urethane, or oil and wax, are two options.
17 The last step is to thread the rope. Put a stopper knot in one end of your length of rope. Thread the other end up through the hole in the lead cleat, down through the rope hole in the next cleat, and the next, and so on until you have gone all the way around the perimeter of the vehicle. Thread the end down through the cleat hole and, pulling the rope as tight as possible, tie another stopper knot. A couple of clamps, or an assistant, can be used to spring your curve down somewhat while you are doing this. Release the clamps, tie on a four-foot towrope, and you are finished.
One final thing you could do while you are waiting for snow, is wax the bottom of your toboggan, but this is entirely optional.